How to Make a Spa-Quality Mask at Home
To create a spa-quality mask at home, start by selecting ingredients tailored to your skin type—like honey for hydration or clay for oil control. Prep your skin by cleansing, exfoliating, and steaming. Mix your mask in a clean bowl, combining a base like yogurt with your chosen additives. Apply the mask evenly, focusing on problem areas while avoiding your eyes. After letting it set, follow with a hydrating serum and moisturizer to lock in moisture and enhance results. You’ll find even more tips just ahead!
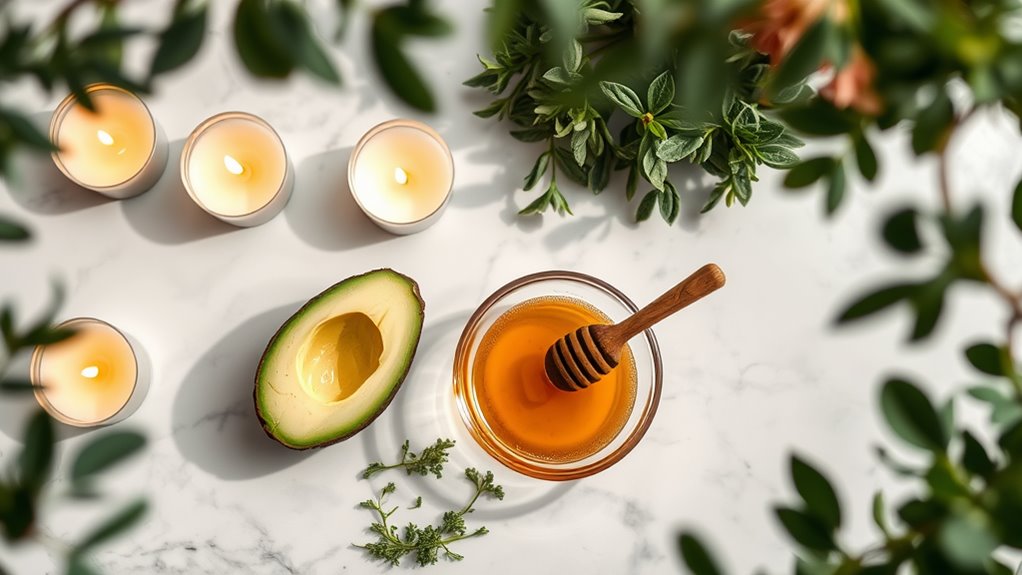
Choosing the Right Ingredients
When you’re crafting your own spa-quality mask at home, how do you choose the right ingredients?
Start by identifying your skin type—whether it’s oily, dry, or sensitive.
For a homemade spa mask, consider natural ingredients that cater to your needs.
For hydration, try honey or avocado; for exfoliation, opt for oatmeal or sugar.
Clay masks work wonders for oily skin, while soothing aloe vera is perfect for irritation.
Always patch-test new ingredients to avoid reactions.
Mixing your ingredients creatively can lead to a tailor-made spa experience that rejuvenates your skin, leaving it fresh and glowing. Additionally, incorporating ingredients like DIY face masks can enhance your skincare regimen by providing targeted benefits for your specific concerns.
Preparing Your Skin
Before you apply your homemade mask, it’s essential to prepare your skin properly to maximize its benefits.
Start with a clean canvas to guarantee your mask penetrates effectively.
Follow these steps:
-
Cleanse: Use a gentle cleanser to remove dirt and makeup.
-
Exfoliate: Gently scrub away dead skin cells for a smoother surface.
-
Steam: Open up your pores by steaming your face for a few minutes.
-
Tone: Apply a toner to balance your skin’s pH and remove any leftover impurities. Additionally, a step-by-step guide can help streamline your skincare routine and ensure effective results.
Mixing Your Spa Mask
Now that your skin is prepped, it’s time to mix your spa mask.
Start by selecting the right ingredients that cater to your specific skin type, whether you need hydration, exfoliation, or soothing properties. Incorporating science-backed DIY mask patterns can help you create a more effective treatment.
Master essential mixing techniques to guarantee a smooth, effective blend that enhances your at-home spa experience.
Selecting the Right Ingredients
Creating a spa-quality mask at home starts with selecting the right ingredients tailored to your skin type and specific needs.
Consider these key ingredients:
- Honey – A natural humectant that hydrates and soothes your skin.
- Avocado – Packed with healthy fats, it nourishes and revitalizes dry skin.
- Oatmeal – Gentle exfoliant that calms inflammation and absorbs excess oil.
- Yogurt – Rich in probiotics, it helps brighten and smooth your complexion.
Essential Mixing Techniques
Once you’ve chosen the perfect ingredients for your homemade spa mask, the next step is to mix them effectively to maximize their benefits.
Start by using a clean mixing bowl and utensils to prevent contamination.
Begin with the base ingredient—like yogurt or honey—then gradually add your other components, stirring gently to create a smooth consistency.
Use a whisk or fork for effective blending, ensuring there are no lumps.
If you’re incorporating powders, like clay or activated charcoal, mix them with a small amount of liquid first to prevent clumping.
Finally, test the texture and adjust as needed before application.
Customizing for Skin Types
Understanding your skin type is essential when customizing your spa mask, as different skin needs require specific ingredients for ideal results.
Tailoring your mask guarantees it addresses your unique concerns.
Here are four ingredients to evaluate:
- Honey – Ideal for dry skin, it hydrates and soothes.
- Aloe Vera – Perfect for sensitive skin, it calms irritation.
- Clay – Great for oily skin, it absorbs excess oil and unclogs pores.
- Avocado – Nourishing for combination skin, it balances moisture.
Mix these ingredients based on your skin type, and enjoy a personalized spa experience that rejuvenates and refreshes.
Application Techniques
Applying your homemade spa-quality mask can make all the difference in achieving glowing skin. Start with a clean face; gently cleanse to remove dirt and oils.
Use your fingertips or a soft brush for application, working from the center of your face outward. This technique guarantees even coverage and helps avoid missing spots.
Focus on areas that need extra attention, like your cheeks or forehead. For best results, apply a generous layer without over-saturating.
Finally, avoid your eye area to prevent irritation. Remember, a consistent application method enhances the mask’s effectiveness, transforming your skincare routine into a pampering ritual. Additionally, using ingredients rich in key ingredients for skin concerns can significantly boost the mask’s overall benefits.
Letting It Set
As you let your homemade mask set on your skin, the active ingredients start to work their magic, nourishing and rejuvenating your complexion.
This is your time to relax and unwind.
To enhance the experience, consider these four indulgent elements:
- Soft music playing in the background, creating a serene atmosphere.
- A warm, cozy blanket draped over your shoulders, adding comfort.
- A few scented candles flickering nearby, filling the air with calming aromas.
- An invigorating glass of infused water at hand, keeping you hydrated.
Incorporating simple treatments into your skincare routine can significantly elevate the results. Embrace the moment, and let the mask do its job!
Post-Mask Care
After your mask treatment, it’s essential to hydrate your skin to maintain that fresh glow. Use a gentle moisturizer and skip harsh products that can irritate your newly pampered complexion. Consider selecting a moisturizer based on your skin type to optimize hydration and skin health.
Hydrate Your Skin
How can you guarantee your skin stays radiant and moisturized after a rejuvenating mask?
The key is proper hydration.
Follow these steps to lock in that glow:
- Apply a lightweight serum with hyaluronic acid to boost moisture levels instantly.
- Use a nourishing moisturizer that suits your skin type to seal in hydration.
- Incorporate a hydrating facial mist throughout the day for an extra boost.
- Drink plenty of water, replenishing your skin from the inside out.
With these simple steps, you’ll maintain that dewy, spa-like complexion long after your mask treatment!
Avoid Harsh Products
While your skin feels rejuvenated after a nourishing mask, it’s essential to protect that delicate balance by steering clear of harsh products.
Avoid cleansers with sulfates, alcohol, or strong fragrances that can strip away moisture and irritate your skin. Instead, opt for gentle, hydrating cleansers that soothe and maintain your skin’s pH.
After cleansing, skip aggressive exfoliants for a few days; your skin needs time to recover.
Focus on nourishing serums and moisturizers rich in antioxidants and hyaluronic acid to keep your skin glowing.